From speeding up employee onboarding to taking the headache out of records retention, Laserfiche workflows can give your employees back hours of their time each week. And best of all, you don’t need to be an IT professional or computer programmer to set them up. Learn from guest contributor Amy Johnson how to design your first no-code Laserfiche workflow!
As the Systems Administrator in the Commissioner of the Revenue’s Office, I designed and implemented the department’s workflows myself. Hanover County IT department only provides support – not configuration. Here are some of my strategies for planning, designing, and implementing your very first workflow. I know it can seem scary, but you can do it!
How to Design Your First No-Code Laserfiche Workflow
 Make a list of ideas of processes within your department or organization that you would like to automate. Remember to start simple. Sometimes, the small workflow is as important as the big, flashy one. So for your first go-around, find a process that has relatively few steps and not very many exceptions.
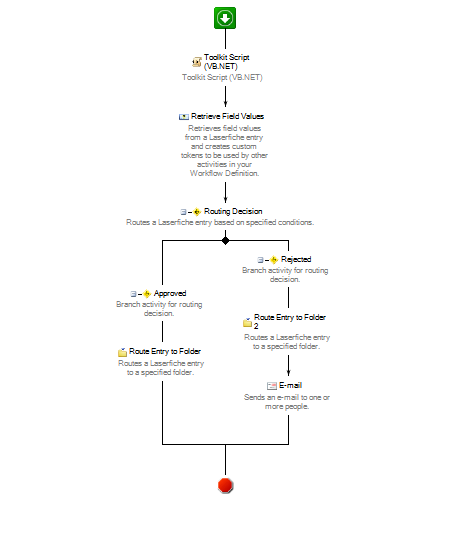
Our first no-code workflow dealt with obtaining Statutory Assessment worksheets. It routed them to managers for approval and then to the records folders for storage and retention.
 Determine a specific goal for your workflow. In my case the goal was to eliminate redundant printing of Statutory Assessment worksheets.
Ask yourself whether you are automating a process or trying to solve a problem. If you see or experience an actual breakdown in the efficiency of the current process, then you should first solve the problem before automating the process.
 Take advantage of the multitude of resources available to Laserfiche users.
The Visit Building Laserfiche Workflows Certification course taught me how to approach planning, diagramming, and designing my workflows.
The many white papers and training videos available on the Learn and Support Site provide specific details on various aspects of the workflow design process.
Your VAR/Solution Provider is also an excellent resource. I put MCCi support on speed dial and called them whenever I ran into problems or lost my confidence.
 Time spent diagramming up front will more than pay itself back later. Sometimes you may think that the process works one way, but there are specific steps you may have skipped.
Gather all the stakeholders in one place and come up with a diagram of how the business process automation should look. I invited the managers who are responsible for approving the Statutory Assessment worksheets as well as the division manager to join me. I drew out the whole process on a piece of paper, and we discussed the detailed steps together, going into such specifics as to how the manager would prefer to approve the worksheets (with a template field or a personal stamp).
Remember that it is OK to change or revise current processes to make your workflows as efficient as possible.

 Once the current process is thoroughly outlined, you can begin working within Laserfiche Workflow itself. Here are some things to keep in mind when designing your workflow:
- You must have Workflow Designer installed on your computer or on the machine where you want to create the workflow.
- It is best practice to create a user account for Laserfiche Workflow in the Administration Console. This user will be the one performing the automated tasks when the workflows run.
- The Workflow user should be excluded from being able to initiate workflows to prevent “runaway workflows” – workflows that keep initiating themselves in an endless loop.
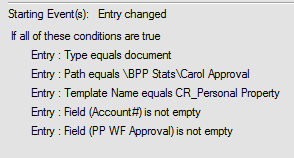
- Make the entry type (document, folder, etc.) and path as specific as possible to prevent the workflow from starting when you do not want it to.

 Even the experts need a few tries to get things 100%, so expect that your first attempt will require a lot of testing and tweaking. I had to test my first workflow at least 15 times before I got it to work exactly how I wanted it to!
It is much safer to test on sample documents than live data. You can create sample documents and then run them through the workflow as you are designing it to make sure it functions as expected.
  Listen to your stakeholders and be prepared to revise this workflow as needed. Make the changes you want in the Laserfiche Workflow Designer and republish until you are fully satisfied. After my first workflow went live, I had to revise some of the email activities because, after seeing the process in action, we found that they could be optimized.
  Congratulations! You’ve completed your first Laserfiche workflow. Now, go back to that list of ideas you created in Step 1. Based on what you learned, what do you want to tackle next?
FAQ
When setting up your Laserfiche workflow, watch out for several common pitfalls. Inefficiencies may persist despite automation, so it's crucial to regularly review and optimize processes. Be prepared for potential user resistance, and address it through effective communication and training. Additionally, anticipate technical challenges and seek assistance from support forums or your solution provider when needed. By proactively addressing these pitfalls, you can ensure smoother workflow implementation and ongoing efficiency.
To effectively prioritize workflows within your organization, start by identifying processes that occur frequently and have a significant impact on productivity or resource allocation. Begin with simpler workflows to gain familiarity with the Laserfiche platform before tackling more complex processes. Consult stakeholders across departments to gather input on prioritization based on their insights and the potential benefits to the organization. By strategically prioritizing workflows, you can maximize efficiency gains and ensure alignment with organizational goals.
To maintain the effectiveness of Laserfiche workflows over time, establish a regular review process to identify areas for improvement or optimization. Provide ongoing training and support to users to ensure they understand how to utilize and troubleshoot workflows effectively. Foster a culture of continuous improvement within your organization by actively seeking feedback from users and implementing their suggestions. Stay informed about updates and best practices to keep workflows aligned with organizational goals and evolving needs. By prioritizing maintenance and optimization efforts, you can maximize the long-term benefits of Laserfiche for your organization.
Interested in learning more about the power of Laserfiche for your organization? Contact us today and see how you can run smarter.


